Manually Creating The “Nashville” Effect
Starting Image
Find and image you'd like to play with, fire up either image editor. Save an alternate copy of your image so that you can revert at any time you need to.
Create a new Layer and fill it with a pale yellow color, then set that layer’s blending mode to multiply.
You can use a color similar to this RGB recipe, if you prefer. The RGB recipe of 250, 220, 175 and the hex #fadcaf will both recreate a similar color in either program.
(Author’s note: Changing this color can definitely affect your final result—so experiment with it!)
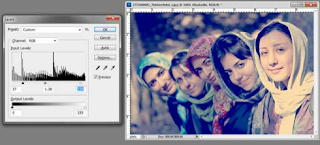
Jump back to your background layer. We’re going to make three quick adjustments to the background. First, adjust the central slider bar, moving it over toward the left side of the histogram. You should be adjusting in all three channels of your RGB.
To open Levels, Press Ctrl + L in Photoshop
Then, change levels to work in the “Green” channel, and adjust the output levels by moving them closer to the right side of the screen. Be certain to do this in the Green channel, and not any other, or the RGB channel.
Change your levels to adjust the “Blue” channel, and dramatically adjust the Output Levels slider. Once you’ve done all three of these, you can press OK.
 With only those few steps, a photo can be dramatically transformed. You can always go further, but this is a fine vintage look in and of itself.
Vintage photo effects sometimes try to destroy detail, such as the flattened blacks and highlights to simulate bad prints or aged photo papers. Additional adjustments to levels can add to this effect, but are not necessary.
*Thanks for this trick from
http://www.howtogeek.com/68431/create-instagram-style-photo-effects-with-gimp-or-photoshop/


 With only those few steps, a photo can be dramatically transformed. You can always go further, but this is a fine vintage look in and of itself.